This simple guide is mainly aimed at people who have ripped tv show episodes off of a blu ray disc and who want to compress them down to a much more reasonable file size while maintain things like quality and choice of audio and subtitle options. Just follow the steps below!
To be honest, I’m no compression genius. This guide will get you most of the way there. You’ll end up with videos in the 200MB to 500MB range for a normal tv episode. That’s about 90% smaller than what they are on a blu-ray rip. More can be done, and there’s tons of helpful and perhaps unhelpful guides on how to further teaks and customize these settings to squeeze every bit of quality and compression out of this task, if you want to track them down.
Step 1. Gather Your Tools
You’ll need a few of things for this project:
- The videos you want to compress. I’m kinda assuming you have a big rip of your own Blu-ray, one file per episode, but this guide will work with most anything.
- VLC – This media player application can handle just about anything you throw at it. We’ll mostly use it here to help us keep track of audio tracks and subtitle tracks.
- HandBrake – This compression application has an endless array of settings. We’ll go tab by tab and only set the things we care about to keep it simple.
Step 2. Name Your Videos
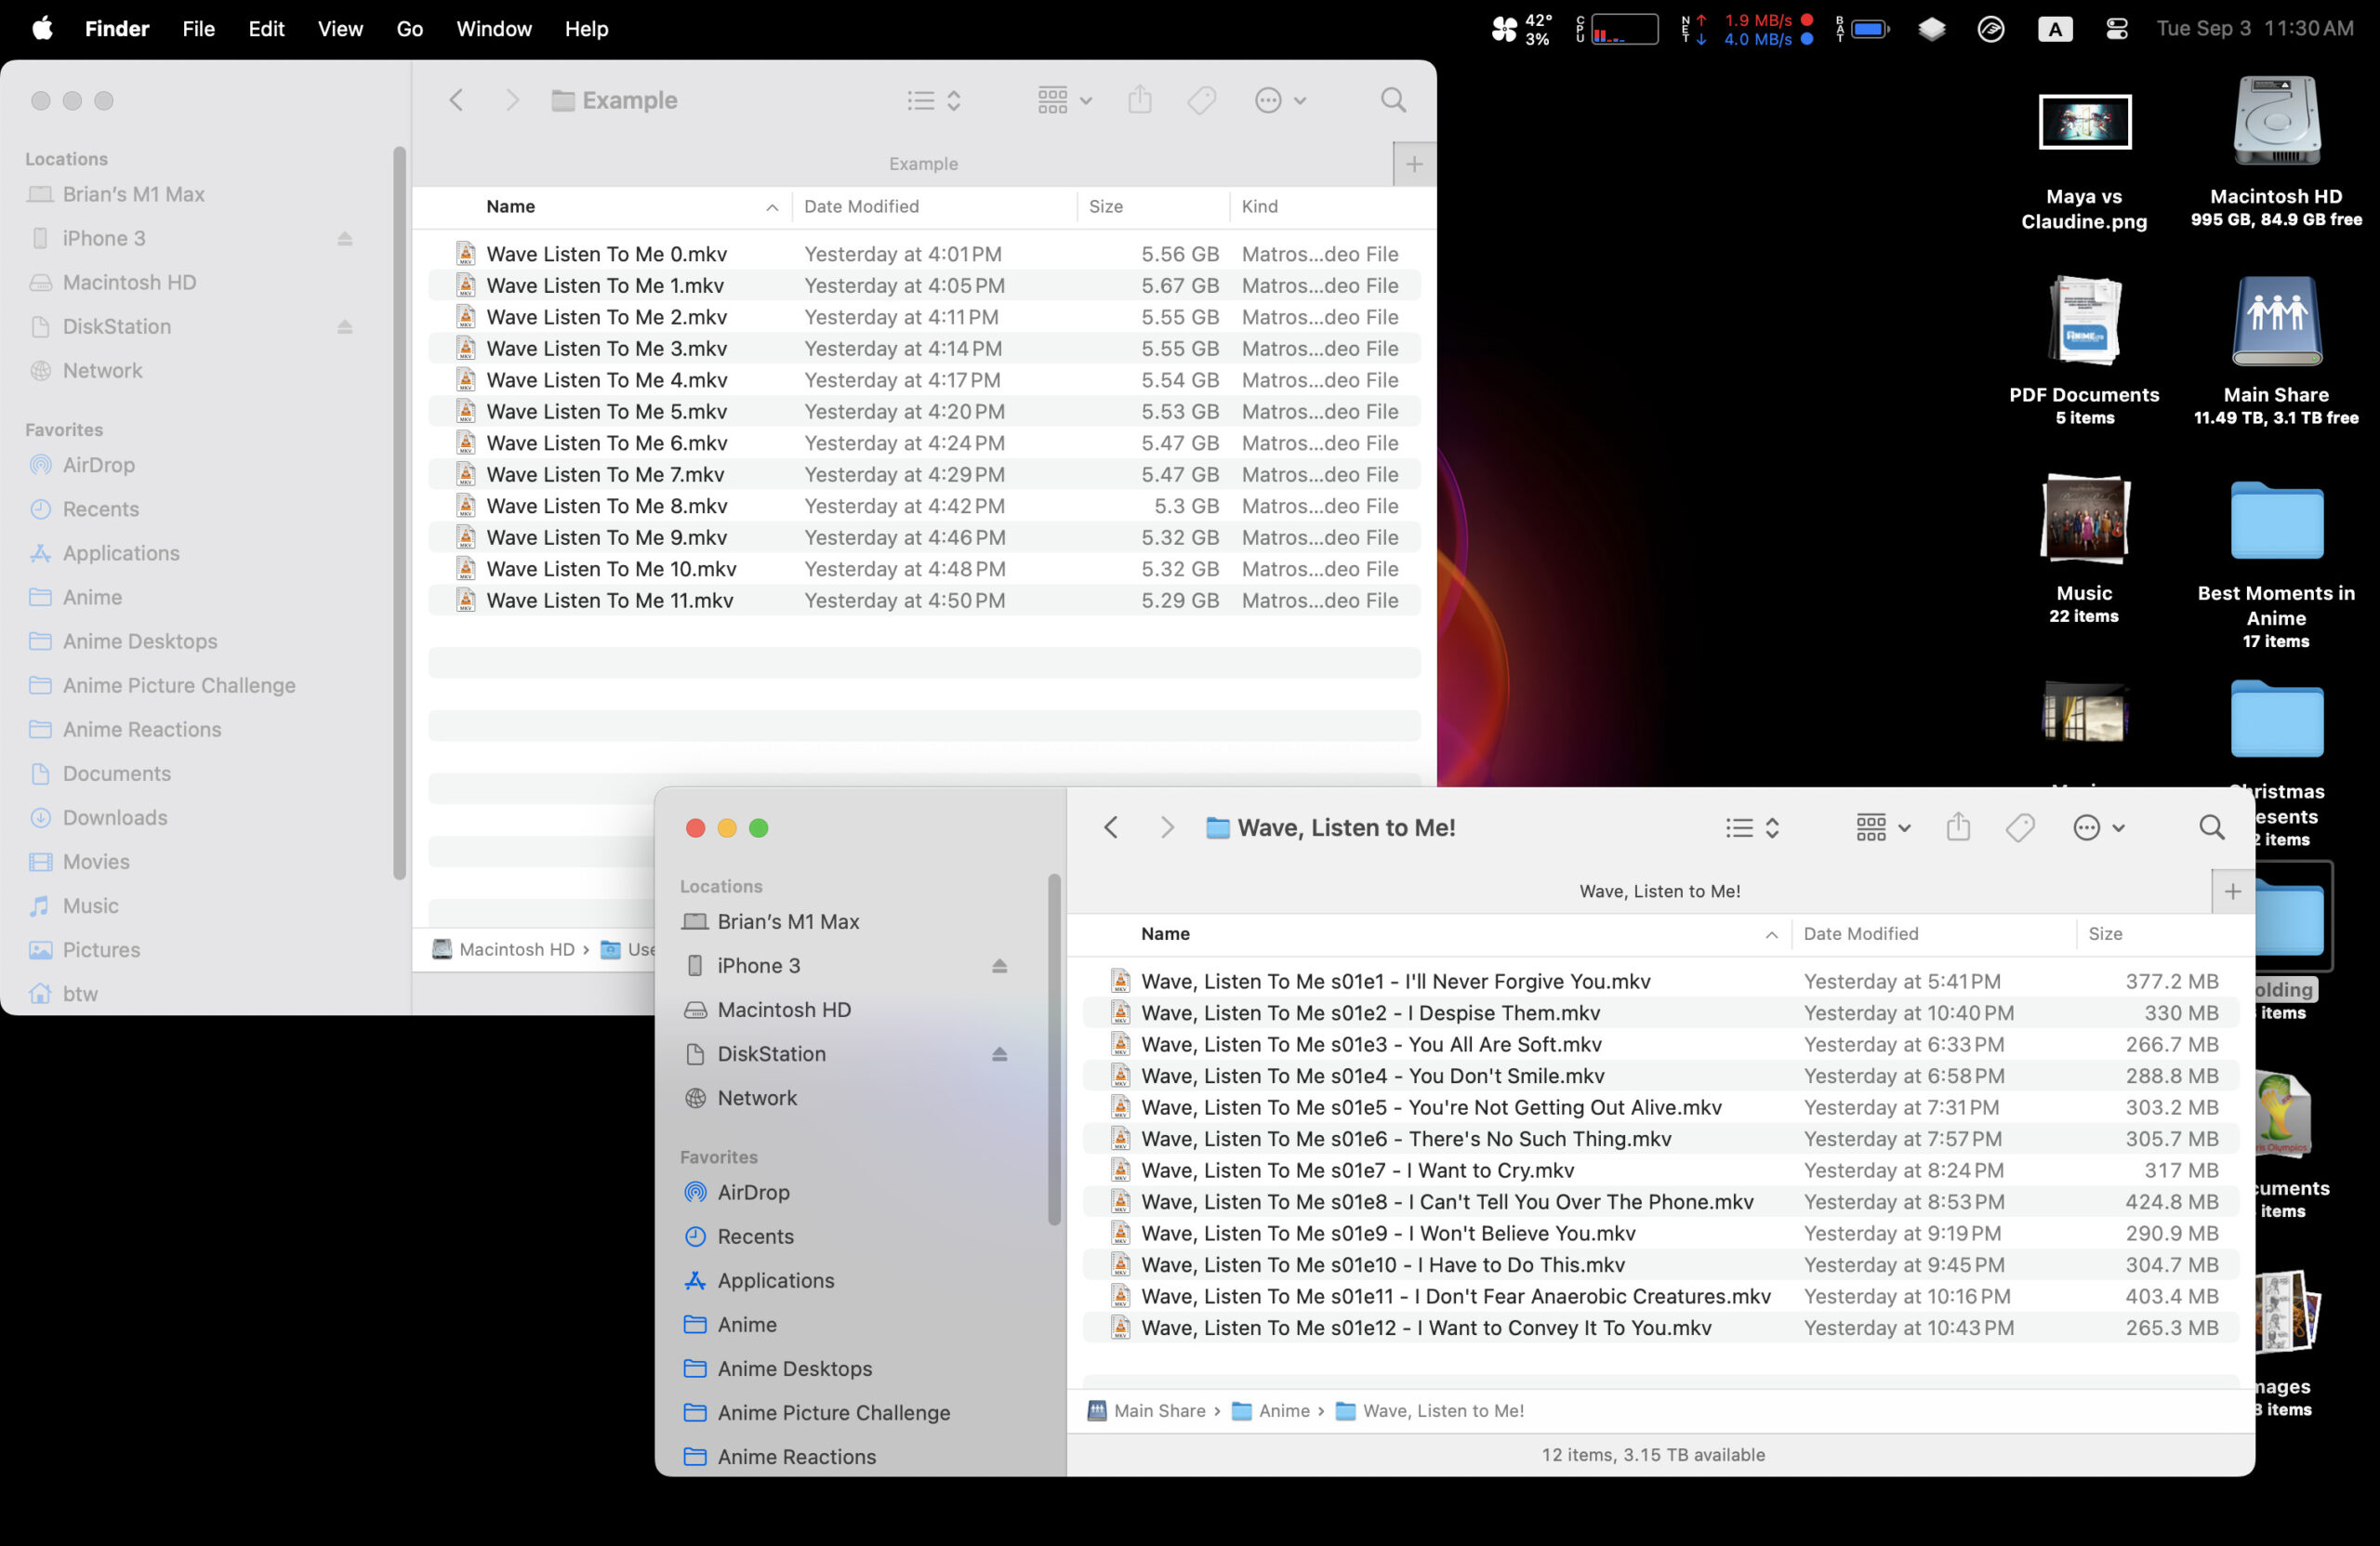
We’re going with the assumption that you have ripped a Blu-ray into one video per episode, but the names are pretty basic. Something like “Show Name 1.mkv”. While it’s not strictly necessary, I highly encourage you to adopt a common naming scheme across all your collection. For one, it makes it easier to find an episode if you just have a desire to play it or are looking to reference it. For another, good naming helps video organizing and serving applications like Plex pull down show orders and descriptions for your collection.
The scheme I use is pretty simple: “Show Name s01e01 – Episode Title”. That give me something like: “Wave, Listen To Me s01e4 – You Don’t Smile.mkv”. Naming all your videos as a first step is a bit tedious, but it will help keep things organized later, and make you task of compressing them a bit easier as you’ll never lose track of which you’ve done. And, once the long encode finishes, you’ll be actually done instead of having to go back and do the naming later.
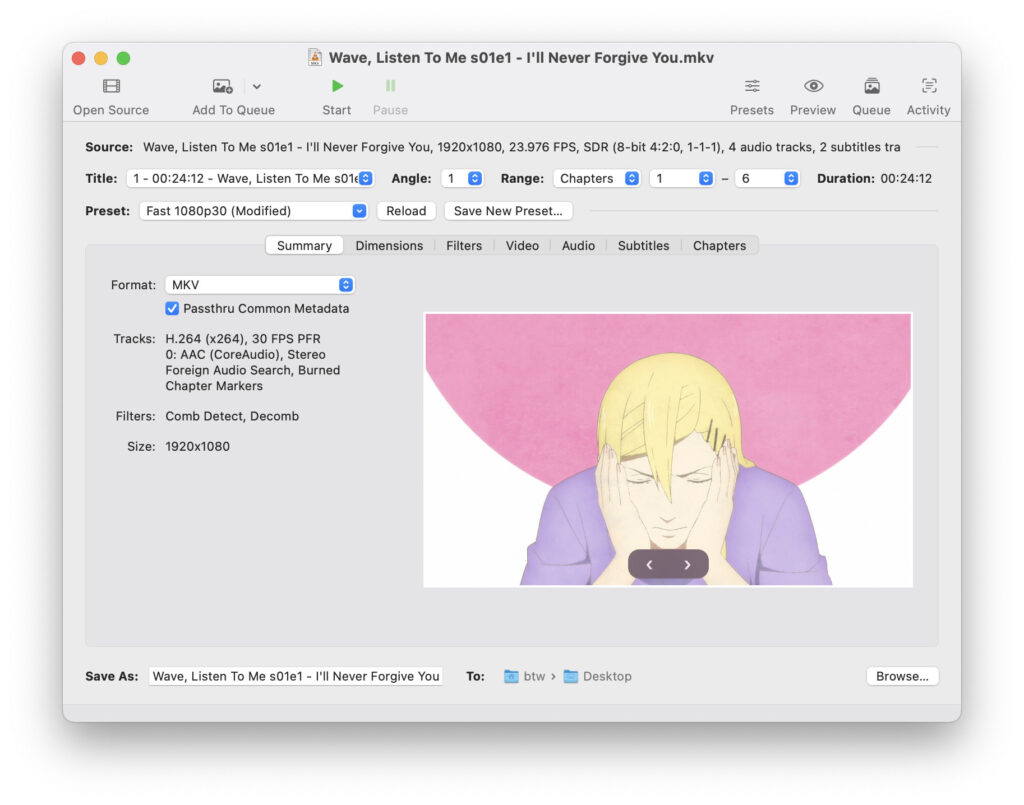
3. Add A Video To HandBrake
Once you’ve name your video, open HandBrake and drag and drop your first video on there or browser your way to it. HandBrake will probably start you on the Summary tab, but if not, go there and set the Format pulldown to the MKV filetype. MKV is a great container format that lets you include all the video/audio/subtitle tracks you want and works with video server apps like Plex.
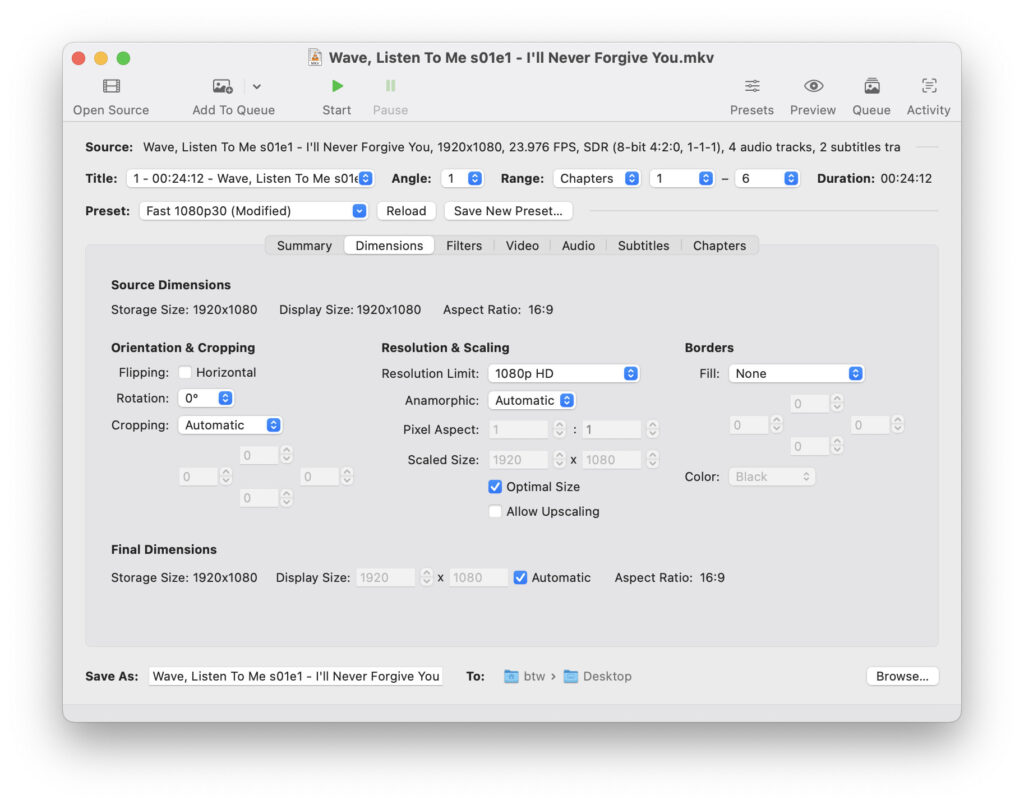
3. Dimensions Tab
Not much to do here other than set the output pixel dimensions of your compressed video. I do a lot of anime compression from purchased sets, and almost all of those come at 1080p resolution, so I set the Resolution Limit to “1080p HD”. If you happen to have a 4K movie you want to keep 4k, use the 2160p 4K Ultra HD setting instead. And, if you’re looking to save space you can always set this pulldown menu to the 720p or 480p settings for a smaller video.
5. Video Tab
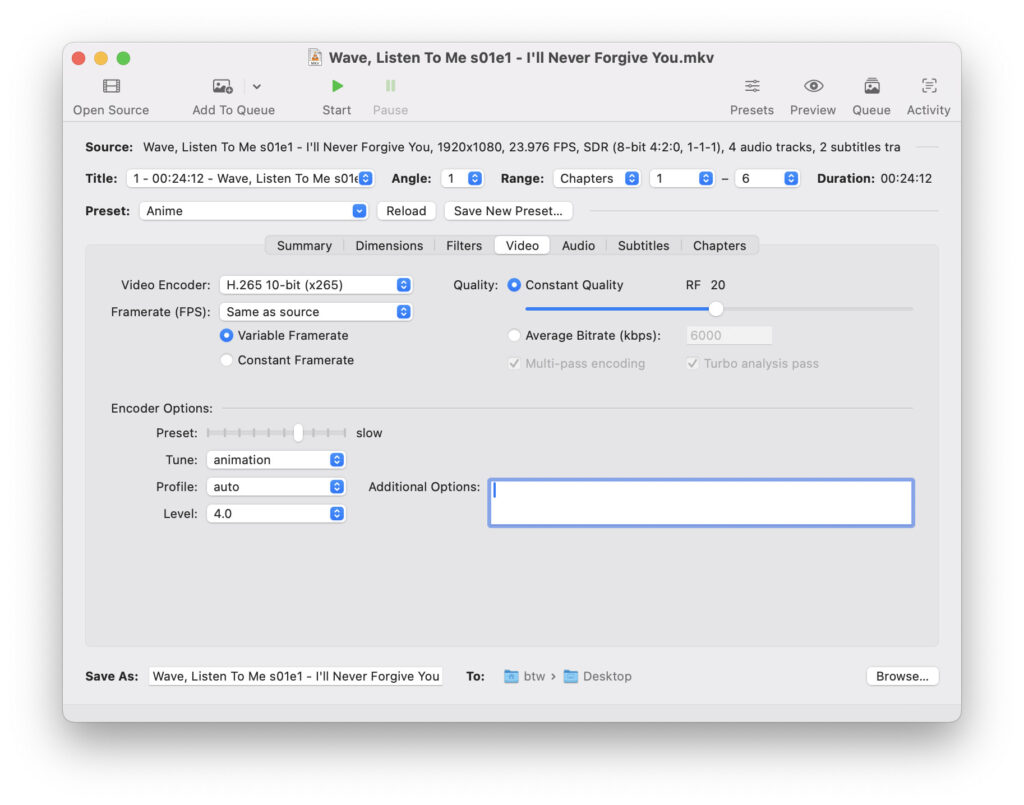
This is where the magic happens! We’re gonna flip a few settings in this tab.
- Set your Video Encoder to: “H.265 10-bit (x265)” – h.265 is a reasonably modern video format that has the advantage of working with practically all video decoding hardware in your computer or smartphone so your devices can play it back easily at low power. The 10-bit setting allows the encoder to use a wider range of color values. This will result in a slight larger file, but helps prevent ugly color banding in tricky areas like subtly shifting skies or skin tones.
- Set Framerate (FPS) to: Same as source. – We don’t want the encoder messing with the framerate of our videos. This just lets it match whatever your video was already in.
- Set the Quality slider to: Constant Quality RF 20. The smaller the RF value, the higher the quality. Values around 25 give decent quality and a smaller file size, but I found that tricky scenes will start getting blocky artifacts or color banding at 25. I did a bunch of trial and error tests and found increasing the quality to 20 solved all the visual issues I’ve seen so far.
- Set the Tune option to animation if you’re encoding something like anime, otherwise leave it on none. – Honestly, I forget what the animating setting actually does, but it’s been a part of my preset for a long, lone time and my videos look great, so let’s keep it…
- Set the Preset setting under Encoder Options to: Slow – This just tells the encoder to take more time and do more compression of your file. End result: it will take longer to compress an episode, but you get a bit smaller file size out of it.
- Set Profile to: Auto. Set Level to: 4.0 – I think these last two come that way, but check just in case.
- There’s a whole lot more that can be down on the Video tab. See that box for additional options? Serious compression pros will fill it with a long string of text command options tailored to their exact video and get ever so slightly better results. Totally feel free to look up advanced options if you’d like. For now, we’re not gonna bother.
6. Audio Tab
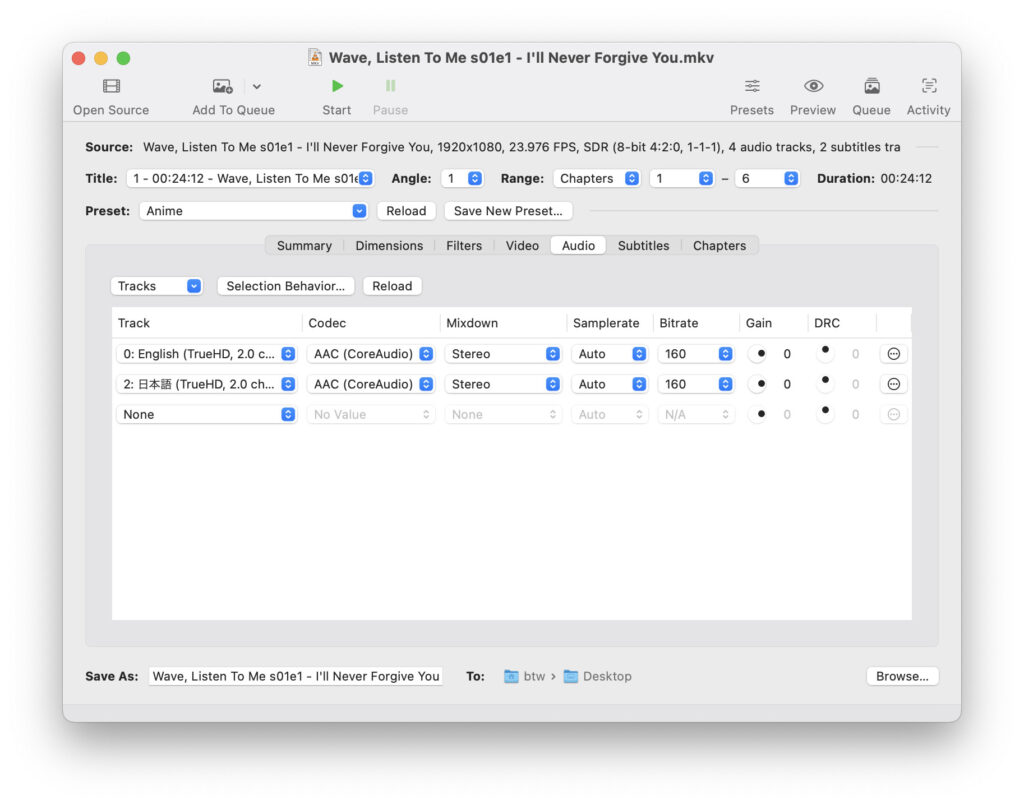
Here’s where things can get a little tricky. Or maybe not! It’s all gonna depend on what audio tracks your video started with. For something like an anime, I’ve seen episodes that have a Japanese language track, an English language track, a Japanese Commentary track, and an English commentary track. By default, HandBrake just grabs the first track it sees, so if you don’t want to lose anything you’ll need to step in and add the tracks yourself.
- Adding tracks is easy. I recommend deleting them all first by clicking the pulldown menus and setting them to None.
- Then, add the tracks back one by one by clicking the same menu in each row in the order that you prefer. The key here, though, is some blu-rays will have multiple versions of the same audio. You’ll probably want to pick the highest quality ones. In general, things like TrueHD, and DTS-HD are what you’ll want.
- Set the Codec menu to AAC. If you really, really want to preserve exact audio quality at the expense of file size you can set it to the lossless FLAC. This will substantially increase your file size and do very little for sound quality, though. (Fight me, audio nerds!)
- Set the Mixdown menu to whatever is appropriate. If the track is listed as just stereo, leave it stereo. If the track is 5.1 or something else, be sure to match that in this menu so you don’t lose anything.
- Finally, use the … buttons at the far right to name your tracks. Just something like “English” and “Japanese” and “English Commentary” or whatever is fine. This just makes it easier to select the language track you want to listen to.
7. Subtitles Tab
This is our other tricky tab. Not quite as bad as the audio tab, but you’ll want to get the things in this tab right if you’re compressing something like Anime that makes use of a lot of subtitles.
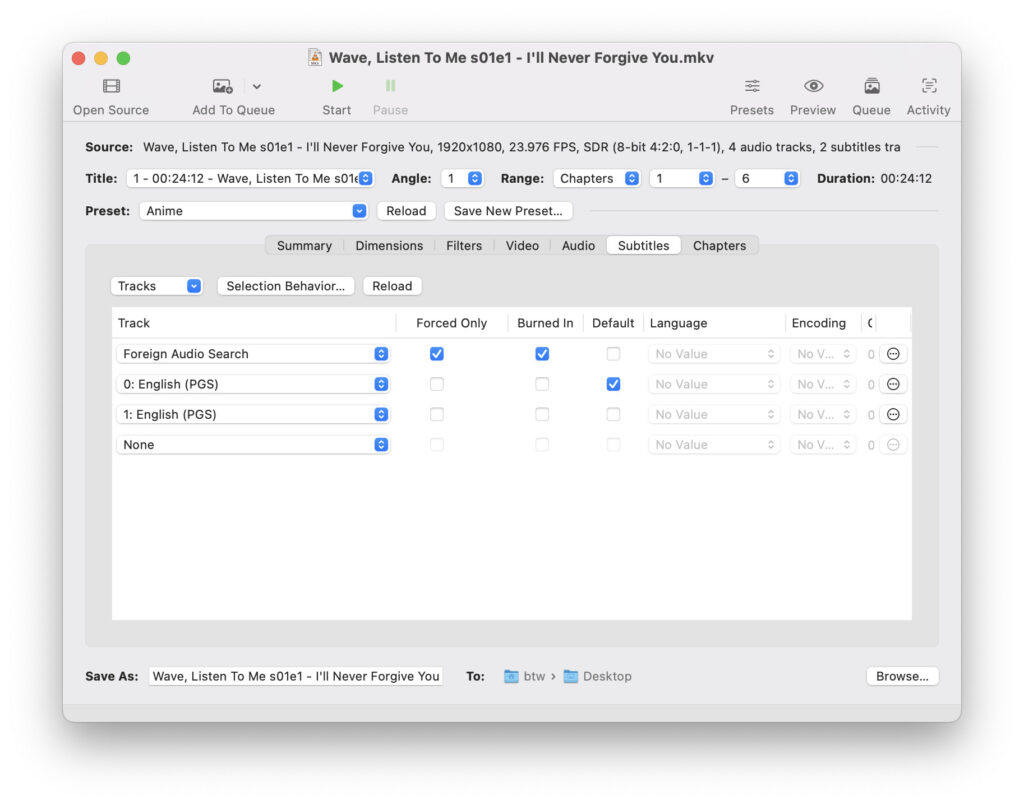
- This tab works a lot like the audio tab. The tricky part here is, while the audio tab will usually tell you the language and type of audio you’re dealing with, often times the Subtitles tab kinda doesn’t know what you’ve got and doesn’t do much to help you. Like with the audio tab, start out by clearing everything out by setting all the rows’ track setting to None
- Next, you’ll probably want to open your episode rip in VLC and go through the different Subtitle tracks under the Subtitle menu to figure out what each is. Something like anime will generally have a Signs & Songs track and a full Dialogue track. But there could also be a commentary track or two depending on how fancy your show is. And be careful, as sometimes things like commentaries only appear on one or two episodes out of a season. The good news is, these will be in the same order as HandBreak sees them which will help us a lot!
- Back in HandBreak, start adding in the subtitle tracks. Foreign Audio Search is used on some blu-rays to put subtitles up when say an alien or foreign language speaker says something in a language you can’t understand but the show is intentionally subtitling for you. Put this track first and click the Forced Only and Burned In checkboxes. This will make sure these critical translations appear no matter what else is happening with your subtitles.
- Now add the other tracks in the order your prefer. I like to do the Signs & Song track first, then the full Dialogue track second, and any commentary tracks last. You can use the Default checkbox on one of these tracks to make your video application / server automatically start with those subtitles. So, if you’re like me and like listening to the english dub of anime, you’d probably want to make the Signs & Songs track the default. If you like watching foreign language shows and want the english subtitles to come up automatically, then set that track as the default.
- Finally, like the audio tab, use the … button to label each track. You can skip the foreign audio track as it won’t actually show up in a list when playing an episode. But do be sure and name the others as this can be very helpful when trying to remember which subtitles are which.
Note that the Burned In setting for subtitles “burns” those subtitles onto the video itself so you can’t turn them off. Generally, you don’t want this, but sometimes you might. Imagine exporting a clip to share with someone else and you don’t want them to need to deal with turning subtitles on or off. You can just burn them in and they won’t have to worry about it.
8. Chapters Tab
Generally, you can leave this alone. Most shows and movies on blu-ray come with marked chapters which will show up here. If your show for some reason didn’t, you can totally find points where you want chapter markers and add them here, but I don’t think I’ve ever had to do that.
9. Add To Queue and Start
Once you have everything set, press the Add To Queue button up top to put your current video with these settings into the list of videos to be compressed. After that, press start then go grab your next video and repeat these steps.
Some things you’ll need to do again. The settings in the Video tab fortunately stay set, but you’ll need to add and label your audio and subtitle tracks for each video. There are ways to automate those two tabs somewhat. Like, with enough fiddling you can get the audio tab to correct detect and grab just the high quality audio tracks. But it won’t label them for you. The subtitles tab won’t set defaults for you. So I find it’s best to just be methodical and add videos one at a time and make sure everything is set the way you want before adding each video to the queue.
Under these settings with a reasonably powerful computer encodes are close to real time, meaning a 30ish minute video will take about 30 minutes to compress. Which, yes, means a typical 10-ish episode season is going to take 5ish hours to complete. But the end result will be a reasonable file size and very high quality video and audio.
10. Save Your Preset
Once you have everything set the way you want, go into the Presets menu and save your preset. You’ll still have to add your audio and subtitle tracks by hand, but at least it’ll save you the time of checking things like video or resolution settings. And, it’s a good habit because you may find yourself making different presets for different purposes. For instance, I’ve got a preset for when I just want to clip out a small video for use on social media. I’ve got one for saving YouTube reaction videos at a much smaller size and quality than the full quality videos that person is reaction to. Stuff like that.
